How to Create Stylized Feathers and Fur in Blender
? Free Blender Tools & Assets ?
?️ MoGraph Toolbox (Free Tools)
https://superhivemarket.com/products/blender-mograph-toolbox
? Stop-Mo (Free Stop Motion Addon)
https://superhivemarket.com/products/stop-mo
? Pixel Kit (Free Pixel Art Addon)
https://superhivemarket.com/products/blender-pixel-kit
⚡ Dynamic VFX Pack (Free Sample Pack)
https://blendermarket.com/products/blender-dynamic-vfx---elemental-asset-pack?ref=434
? Crafty Asset Pack (Free Sample Pack)
https://blendermarket.com/products/crafty-asset-pack?ref=434
❤️ Support the Channel
Patreon
https://www.patreon.com/southernshotty
Skillshare
https://www.skillshare.com/r/user/southernshotty
────────────────────────────────────────
? Tag me in your artwork!
Instagram: https://www.instagram.com/southernshotty/
X (Twitter): https://twitter.com/SouthernShotty
@SouthernShotty
────────────────────────────────────────
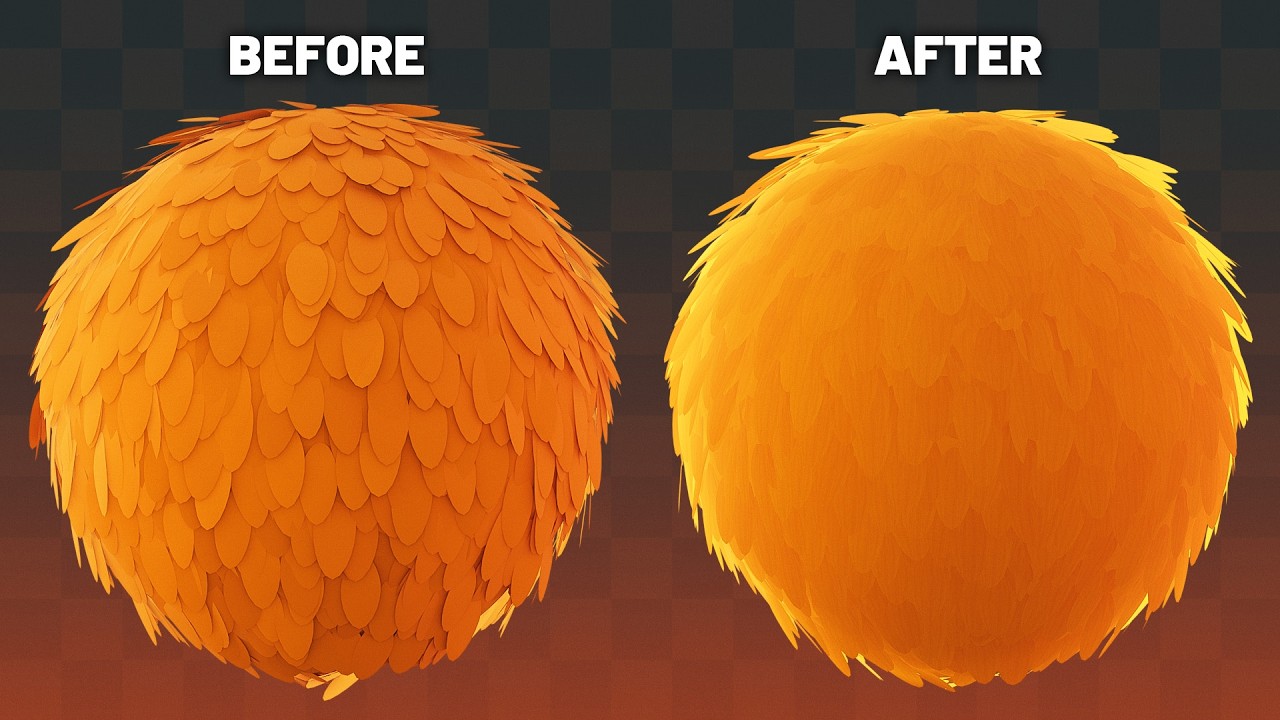
Want soft, stylized fur or feather systems without millions of polygons? In this tutorial, I'll show you how to build a lightweight Geometry Nodes feather system that looks smooth, performs well in Eevee, and avoids the harsh shadows and artifacts common with traditional scattering methods. We'll also add subtle animation, randomized colors, and a custom shader to bring everything to life.
This workflow is perfect for stylized characters, creatures, cozy scenes, and game-ready assets where you need a clean look without sacrificing performance.
In This Video You'll Learn
• Creating a procedural feather system with Geometry Nodes
• Setting up Blender's Scatter on Surface modifier
• Smoothing feather shading with custom normals
• Adding subtle procedural feather animation
• Randomizing feather colors using named attributes
• Building a stylized feather shader from scratch
• Creating gradients and feather texture details
• Adding artificial rim lighting for stylized renders
• Eevee settings for cleaner fur and feather rendering
• Layering multiple feather systems for richer results
• Using weight painting to control feather placement
Traditional fur and feather systems often require extremely high densities to hide visible intersections and harsh shading. This workflow instead smooths the lighting using custom normals while keeping the geometry lightweight, resulting in cleaner renders and much better viewport performance.
Tools Used
• Blender Geometry Nodes
• Scatter on Surface Modifier
• Eevee
• Noise Textures
• Custom Normal Workflow
• Procedural Materials
If this tutorial helped you, leave a like and let me know what stylized Geometry Nodes tutorial you'd like to see next.
Subscribe for more Blender tutorials, Geometry Nodes workflows, stylized rendering techniques, and practical production tips.
Chapters
00:00 – Overview
00:27 – Building the System
03:37 – Geometry Nodes Setup
07:18 – Adding Animation
10:20 – Creating the Shader
17:00 – Final Tweaks
?️ MoGraph Toolbox (Free Tools)
https://superhivemarket.com/products/blender-mograph-toolbox
? Stop-Mo (Free Stop Motion Addon)
https://superhivemarket.com/products/stop-mo
? Pixel Kit (Free Pixel Art Addon)
https://superhivemarket.com/products/blender-pixel-kit
⚡ Dynamic VFX Pack (Free Sample Pack)
https://blendermarket.com/products/blender-dynamic-vfx---elemental-asset-pack?ref=434
? Crafty Asset Pack (Free Sample Pack)
https://blendermarket.com/products/crafty-asset-pack?ref=434
❤️ Support the Channel
Patreon
https://www.patreon.com/southernshotty
Skillshare
https://www.skillshare.com/r/user/southernshotty
────────────────────────────────────────
? Tag me in your artwork!
Instagram: https://www.instagram.com/southernshotty/
X (Twitter): https://twitter.com/SouthernShotty
@SouthernShotty
────────────────────────────────────────
Want soft, stylized fur or feather systems without millions of polygons? In this tutorial, I'll show you how to build a lightweight Geometry Nodes feather system that looks smooth, performs well in Eevee, and avoids the harsh shadows and artifacts common with traditional scattering methods. We'll also add subtle animation, randomized colors, and a custom shader to bring everything to life.
This workflow is perfect for stylized characters, creatures, cozy scenes, and game-ready assets where you need a clean look without sacrificing performance.
In This Video You'll Learn
• Creating a procedural feather system with Geometry Nodes
• Setting up Blender's Scatter on Surface modifier
• Smoothing feather shading with custom normals
• Adding subtle procedural feather animation
• Randomizing feather colors using named attributes
• Building a stylized feather shader from scratch
• Creating gradients and feather texture details
• Adding artificial rim lighting for stylized renders
• Eevee settings for cleaner fur and feather rendering
• Layering multiple feather systems for richer results
• Using weight painting to control feather placement
Traditional fur and feather systems often require extremely high densities to hide visible intersections and harsh shading. This workflow instead smooths the lighting using custom normals while keeping the geometry lightweight, resulting in cleaner renders and much better viewport performance.
Tools Used
• Blender Geometry Nodes
• Scatter on Surface Modifier
• Eevee
• Noise Textures
• Custom Normal Workflow
• Procedural Materials
If this tutorial helped you, leave a like and let me know what stylized Geometry Nodes tutorial you'd like to see next.
Subscribe for more Blender tutorials, Geometry Nodes workflows, stylized rendering techniques, and practical production tips.
Chapters
00:00 – Overview
00:27 – Building the System
03:37 – Geometry Nodes Setup
07:18 – Adding Animation
10:20 – Creating the Shader
17:00 – Final Tweaks

SouthernShotty
Learn all things Blender 3D with a focus on characters, animation, rigging, and motion graphics!...